rss

Monday, April 12, 2010

How to Reset Canon 1980 or Canon iP1900 series

Although software resetter for Canon iP1980 or canon iP1900 series not available now. Doesn’t mean there is no way to reset the printer. To reset Waste Ink Tank canon iP1980 or iP1900 series follow this steps:

  1. Press Resume button hold for 1 – 2 minutes
  2. Open the cover
  3. Release the catridge and then put catridge again
  4. Close The Cover
  5. Turn Off
  6. Then Turn On again

Or try these methode :
  1. USE GENERAL TOOL http://www.ziddu.com/download/3063183/GeneralToolsforCanonPixmaip1880-xp.rar.html
  2. CHANGE USB PORT change into CANON PORT
  3. Click lock release
  4. Click ip1800
  5. Click device id
  6. Clear waste ink counter by clicking MAIN & PLATEN
  7. Check EEPROM Box
  8. Click EEPROM Dump
  9. Test pattern 1
  10. Your Done…
Download General Tool for Canon iP1980

Read More...

How to Reset Canon MPC190 Waste Ink Counter

Manual Reset Waste Ink Counter Pad Canon MPC190,

  1. Enter SERVICE MODE By pressing Menu, Copy, Scan, Copy, Copy
  2. Select TEST MODE.
  3. Select 8 PRINTER TEST in TEST MODE.
  4. Select 3. [EEPROM CLEAR].
  5. Select 0. [INK COUNT].
  6. Press the [Set] key.
  7. Press the [Stop/Reset] key (returning to the state of 3), and then press the [ON/OFF] key.

Read More...

How to Reset Canon BJ F900, F890, F700, F500

Canon Printers BJ F900, F890, F700, F500 Reset Methode

  1. Turn off the Canon Printers BJ F900, F890, F700, F500.
  2. Press and hold the RESUME button, then press and hold the POWER button.
  3. Release the RESUME button, then press and release the RESUME button two more times in succession. (youre still holding the POWER button during this). The printer mechanics will move momentarily. You are now in Service mode.
  4. Pressing the RESUME key will select a function; for example, pressing RESUME 4 times will select the clear waste ink counter function. The lamp will alternate color with each key press.

  • service/factory test printout, including ink sensor check
  • EEPROM info printout
  • EEPROM initialization
  • Clear the waste-ink counter
  • Printer model setting. (more selections beyond this- leave this alone)
  • After selecting mode, press the POWER button to commit the change, and return to the top of the function selection menu. Pressing the POWER button again turns off the printer for a restart

Read More...

How to Manual Reset Canon Pixma MP450

The Canon Pixma MP450 is a basic all-in-one printer that delivers great features and performance for the price. The Canon Pixma MP450 is inexpensive, offers media card readers, support for infrared and Bluetooth devices, and great print quality.

Manual Reset counter for Canon Pixma MP450 Printers follow this steps:

  1. Turn off the Canon Pixma MP450 Printers .
  2. Hold button Resume/Cancel (red triangle in the circle), click on POWER – an indicator light green.
  3. Release the button Resume / Cancel keeping POWER.
  4. Click Resume/Cancel 2 times, keeping POWER, and then release all the buttons.
  5. When the indicator recorded GREEN – click Resume / Cancel 4 times!
  6. Turn off the Canon Pixma MP450 Printers POWER button.

Read More...

How to Reset Canon Pixma iP6000, iP8500

Manual Reset for Canon Pixma iP 6000, iP 8500

  1. Turn off the printer.
  2. Hold Resume button click POWER.
  3. Hold button RESUME release POWER.
  4. Then press the button RESUME again .
  5. Release all the buttons.
  6. Led Indicator in green and stay green.
  7. Click RESUME button 4 times , if you want to make another transaction. Look at the table below :

  • Orange – Service test print 1 times – Orange – Service test print
  • Green – EEPROM information print 2 times – Green – EEPROM information print
  • Orange – EEPROM initialization 3 times – Orange – EEPROM initialization
  • Green – Waste ink counter setting 4 time – Green – Waste ink counter setting
  • Orange – Destination setting (Press Power > Press Resume 3x) 5 times – Orange – Destination setting (Press Power> Press Resume 3x)
  • Green – Print head deep cleaning 6 times – Green – Print head deep cleaning
  • Orange, Green, Orange – Return to menu selection 11-13 times – Orange, Green, Orange – Return to menu selection
  • Green – Left margin correction 14 times – Green – Left margin correction
  • Turn off the printer POWER button.

Read More...

Software Resetter for Canon iP1200, iP1300, iP1600, iP1700, iP1800, iP2200, iP2500

The program is designed for service works with the printer Canon iP-series in Normal mode at the moment are supported : iP1200, iP1300, iP1600, iP1700, iP1800, iP2200, iP2500.

Features:

  • Expanded information on the printer ink in the cartridge level, and containers for the waste of ink.
  • Printing test samples for testing nozzles PG.
  • Cleaning and deep cleaning PG printer pallet cleansing and cleaning rollers.
  • Changing the delay value for drying.
  • Changing your printer.
  • Reading and dumping EEPROM printer.
  • Obnulenie counters level black and coloured ink cartridges.
  • Clear the counters occupancy “core” and “supplementary” containers for the waste of ink.
Download iPTool version 1.1.3

Read More...

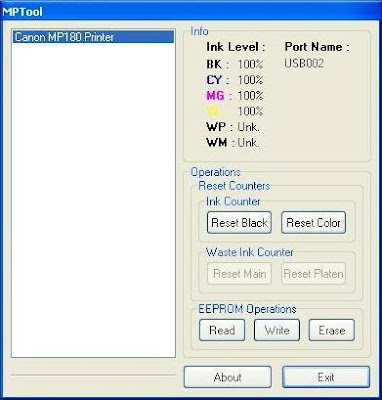
MPTool Software Resetter for Canon MP150, MP160, MP170, MP180, MP450, MP460

The program is designed for service works with the printer Canon MP-Series Low-Level mode at the moment are supported: MP150, MP160, MP170, MP180, MP450, MP460.

Software Features :

  • Expanded information on the level of ink in the cartridge and containers for the waste of ink.
  • Reading, recording and reset the printer EEPROM.
  • Resetting counters level black and coloured ink cartridges. Clear the counters occupancy “core” and “supplementary” containers for the waste of ink.
MPTools for canon Printer MP


Info Section.

Ink Level – shows the level of occupancy ink:

BK – black cartridge.

CY – colored ink cartridge Cyan.

MG – colored Magenta ink cartridge.

YL – Yellow colored ink cartridge.

WM – “core” container for the waste of ink.

WP – “additional” container for the waste of ink.

Port Name – displays the name of the printer port on the system.


Operations ection.

Subsection Reset Counter – Ink Counter.

Reset Black – zeroing meter level black ink cartridge.

Reset Color – zeroing meter level of colour ink cartridge.

Subsection Reset Counter – Waste Ink Counter.

Reset Main – zeroing meter level occupancy ink “main” containers for the waste of ink.

Reset Platen – zeroing meter level occupancy ink “additional” container for the waste of ink.

Subsection EEPROM Operations.

Read – reading EEPROM *. bin in the printer file.

Write – Record *. bin file in EEPROM printer.

Erase – zeroing EEPROM printer.

Download Current version: 0.9.2

Read More...

How to Reset Printers Canon MP Series

How to Reset Printers Canon MP140, MP160, MP180, MP210, MP220, MP460, MP470, MP500, MP510, MP530, MP600, MP610, MP800, MP820, MP810, MP830, MP960, MP970

  1. Start with printer off
  2. Press and hold resume Button (triangle in the circle) and click “Power” button. green led should be on
  3. While holding the Power button, release the Resume Button.
  4. Without releasing the Power Button, click “Resume” button for two times and release Both Buttons.
  5. Click “Resume” for four times then soon click “Power” button, to confirm the selected action (reset counter absorber).
  6. Turn off the printer and turn on again

Read More...

How to Reset Waste Ink Counter for Canon Printers BJC series

Methode Reset Waste Ink Counter for Canon Printers BJC series

Canon BJ-30 BJC-35v BJC-70 Printers reset methode (F14 Error Reset)

  1. Unplug adapter
  2. Hold POWER
  3. Plug in ADAPTER
  4. Release POWER after printer starts
  5. Hold FF and MENU and press POWER
  6. Release after beeps
  7. Press <> Cartridge until 1A is displayed
  8. Press ONLINE
  9. Press POWER to shutoff printer
  10. Unplug printer then re-plug printer

Canon BJC-50, BJC-55, BJC-80, BJC-85, Printers Waste Ink Tank Counter Reset Methode
  1. Unplug Power Cord
  2. Hold POWER and RESUME buttons
  3. Plug in Power Cord
  4. Release buttons after the printers starts up
  5. Hold CARTRIDGE and RESUME
  6. Press POWER
  7. Release all buttons after the beeps
  8. Press CARTRIDGE 16 times
  9. Press RESUME
  10. Unplug the Power cord
Canon Printers BJC-210 BJC-240 BJC-250 BJC-255 BJC-265BJC-4100 BJC-4200 BJC-4300 BJC-4400 BJC-4550 BJC-4650 Waste Ink Reset
  1. Unplug Power Cord
  2. Hold POWER and RESUME buttons
  3. Plug in Power Cord
  4. Release buttons
  5. Open front door of printer
  6. Hold the CARTRIDGE and RESUME buttons
  7. Press POWER
  8. Release all buttons after the beeps
  9. Press CARTRIDGE once
  10. Press RESUME
Canon BJC-600 BJC-600e BJC-610 BJC-620 Printers
  1. Unplug Power Cord
  2. Hold POWER and FF and Print Mode buttons
  3. Plug in Power Cord
  4. Release after the beeps
Canon BJC-2000 BJC-2100 Printers Waste Ink Counter Reset
  1. Remove the Cartridge
  2. Unplug the AC Power Cord
  3. Close Front access panel
  4. Hold down the RESUME/RESET button and plug in the AC power cord
  5. Release RESUME/RESET after plugging in the AC Power cord.
  6. Press the RESUME/RESET once within 5 seconds and release the RESUME/RESET .
  7. Press and HOLD RESUME/RESET for two seconds or more and release it.
  8. Press and HOLD RESUME/RESET for two seconds or more and release it.
  9. Unplug AC Power Cord to set data.

Canon BJC-5000 Waste Ink Counter Reset
  1. Power off printer
  2. Press and hold RESUME then press POWER, The indicator will start blinking.
  3. While the indicator is blinking , Press RESUME twice then Wait until the printer beeps to indicate service mode
  4. When the indicator lights steady GREEN, press RESUME four(4)times. The indicator should be GREEN.
  5. Press Power to set data
Service Test Print
  • Power off printer
  • Press and hold RESUME then press POWER, The indicator will start blinking.
  • While the indicator is blinking , Press RESUME twice then Wait until the printer beeps to indicate service mode
  • When the indicator lights steady GREEN, press RESUME two(2)times. The indicator should be GREEN.
  • Press Power to Print
Nozzle Print
  • Power off printer
  • Press and POWER, until the printer beeps and release.
Demonstration Print
  • While the printer in ON, Press and hold RESUME until the printer plays a melody of beeps.

Manual Service for Canon BJC-5100 Printes to Reset Waste Ink Counter

Self Test
  • Switch Printer off. Hold Power for 1 beep.

Waste Counter Reset Canon BJC-5100
  1. Power off printer
  2. Press and hold RESUME then press POWER, The indicator will start blinking.
  3. While the indicator is blinking , Press RESUME twice then Wait until the printer beeps to indicate service mode
  4. When the indicator lights steady GREEN, press RESUME four(4)times. The indicator should be GREEN.
  5. Press Power to set data
Service Test Print Canon BJC-5100
  1. Power off printer
  2. Press and hold RESUME then press POWER, The indicator will start blinking.
  3. While the indicator is blinking , Press RESUME twice then Wait until the printer beeps to indicate service mode
  4. When the indicator lights steady GREEN, press RESUME two(2)times. The indicator should be GREEN.
  5. Press Power to Print

Nozzle Print Canon BJC-5100
  1. Power off printer
  2. Press and POWER, until the printer beeps and release.

Demonstration Print
  • While the printer in ON , , Press and hold RESUME until the printer plays a melody of beeps.
Canon BJC-3000, BJC-6000, BJC-6100, BJC-6200, BJC-7000, BJC-7100, BJC-8000 Printers
  1. Power off printer
  2. Hold Resume button then press and hold POWER, the beeper will sound once.
  3. Hold POWER and release RESUME
  4. Press RESUME twice
  5. When the indicator lights steady, press RESUME three(3) times. The indicator should be orange.
  6. Press Power to set data

Read More...
How to Reset Ink Level Cartridges PG-40 and CL-41 in Canon Pixma iP 1880

When refilling ink of cartridge PG-40 and CL-41 at Canon Printer Pixma iP 1880, ink level at cartridge do not become automatic full, but we have to do reset manual otherwise you change new PG-40 and CL-41 cartridges, you needn’t reset the cartridges.

There are some ways to reset of type Canon printers cartridge PG-40 and CL-41, one of the way to reset ink level cartridges PG-40 and CL-41, shall be as follows. Before you do reset you have to provide one of Canon Printers Cartridge PG-40 and CL-41 again.

Resetting level ink :

  1. Tide of Cartridge Canon PG-40 and CL-41 (2nd) to Canon Printer Pixma iP1880 and let the cartridge detect untill finish. And try to test print.
  2. After refill of cartidge canon PG-40 and CL-41 (1st), tide the cartidge PG-40 and CL-41 (1st) at printer and try test print again, usually the ink level status have full again. Otherwise succeed to try again.
Note :
Let easierly of first Canon Cartridges PG-40 and CL-41 i give the name (1st), and other Canon Cartidges PG-40 and CL-41 I give name (2nd).

Read More...

How to Manual Reset for Canon Printers S300, S400, S450, S520, S750, S820, S900, S9000 and S Series

Reset Procedures for Canon Printers S300, S400, S450, S520, S750, S820, S900, S9000 and S Series

Try it to Reset Canon Printers S300, S400, S450, S520, S750, S820, S900, S9000 and S Series

Canon Printers S9000, S300, S400 Reset Procedures

  1. Turn off Canon S300, S400, S9000 Printers
  2. Hold down Resume button and press Power button.
  3. Keep holding down Power button and let Resume button go.
  4. Press Resume button 2 times then let BOTH buttons go.
  5. Green lights will flash and then stop blinking.
  6. When green lights are solid, press the Resume button 4 times.
  7. Press the Power button and the printer should turn off, if not, press the Power button once more.
  8. Your Canon S300, S400, S9000 Printers should respond as normal.

Canon Printers S520, S750, S820, S900 and any S Series Reset Procedures
  1. Turn off the printer.
  2. Press and hold the RESUME button, then press and hold the POWER button.
  3. While still holding the POWER button, Release the RESUME button, then press and release the RESUME button two more times in succession.
  4. The printer mechanics will move momentarily. You are now in Service mode. Release the Power Button.
  5. Pressing the RESUME key will select a function; for example, pressing RESUME 4 times will select the clear waste ink counter function. The lamp will alternate color with each key press.
  • Service/factory test printout, including ink sensor check
  • EEPROM info printout
  • EEPROM initialization
  • Clear the waste-ink counter
  • Printer model setting. (more selections beyond this- leave this alone)
  • After selecting mode, press the POWER button to commit the change, and return to the top of the function selection menu. Pressing the POWER button again turns off the printer for a restart.

Canon S450 Printer Waste Ink Reset
  1. Power off printer
  2. Hold Resume button then press and hold POWER, the beeper will sound once.
  3. Hold POWER and release RESUME
  4. Press RESUME twice
  5. Release Power button
  6. When the indicator lights steady, press RESUME three(3) times. The indicator should be orange.
  7. Press Power to set data

Read More...

How to Manual Reset Canon i6100

Reset Procedures Canon i6100

  1. Turn off the printer
  2. Press and hold RESUME button, then press and hold POWER button
  3. Release the RESUME button
  4. Next press and release the RESUME button two more times in succession, then release POWER button.
  5. Press RESUME button for 4 times, this will select the clear waste ink counter function, The lamp will alternate color with each key press.

  • Service/Factory test printout, including ink sensor check.
  • EEPROM - Info printout.
  • EEPROM – Initialization.
  • Reset the Waste ink counter.
  • Printer model setting. (More selections beyond this point – However it is best leave them unaltered – You have been warned!)

Read More...

How to Reset Canon i850, i950 Waste Ink

Follow the step below to to reset Canon i850, i950, Waste Ink

  1. Start with the printer OFF
  2. Hold down RESUME and then hold down POWER
  3. Release RESUME
  4. Press RESUME twice, then release POWER
  5. Let green light blink until printer is done futzing
Select function with RESUME press POWER to execute:

presses – light color – function


Number of presseslight colorfunction
0 pressesgreenTest print (or exit service mode on i960)
1 press orangeEEPROM info print (plus grid nozzle diagnostic on i960)
2 pressesgreenEEPROM initialize
3 pressesorangeReset waste ink counter


Read More...

How to Manual Reset Printers Canon i550, i560, i850, i860, i865, i9100, i9950

Reset Procedures for Canon i550, i560, i850, i860, i865, i9100, i9950 Printers

  1. Turn off Canon i550, i560, i850, i860, i865, i9100, i9950 Printers
  2. Hold down Resume button and press Power button.
  3. Keep holding down Power button and let Resume button go.
  4. Press Resume button 2 times then let BOTH buttons go.
  5. Green lights will flash and then stop blinking.
  6. When green lights are solid, press the Resume button 4 times.
  7. Press the Power button and the printer should turn off, if not, press the Power button once more.
  8. Your Canon i550, i560, i850, i860, i865, i9100, i9950 Printers should respond as normal.

Read More...

How to Reset Canon i255 and i320 Waste Ink Counter

Reset Methode for Canon Printers i255, i320

Step 1 : Manual for service mode

  1. Unplug power and USB.
  2. Open door and hold power button.
  3. Connect power.
  4. Close door, then release power button.
or try other step for manual service mode
  1. Turn off the printer. And disconnect the printer cable.
  2. Press and hold the POWER button, turn on the printer.
  3. The indicator LED should be green.
  4. Press and release the RESUME button , the indicator LED should be orange.
  5. Press and release the RESUME button again, the indicator LED should be green.
  6. Release both buttons.

Step 2 : Software for Permanent
  1. Reconnect the printer cable.
  2. Download and Run General Tools software resetter for Canon printers i320, i255 then
  3. Select USB PORT
  4. Choose SET DESTINATION 1 And it should be reset.
Remark “After service mode use software for permanent reset”

Read More...

Sunday, April 11, 2010

How to Manual Reset Printers Canon Pixma iP4200, iP5200, iP6000 and iP8500

Canon Pixma iP4200, iP5200, iP6000, iP8500 Reset Procedure

  1. Turn off the Printers.
  2. Hold Resume button click POWER.
  3. Hold button RESUME, release POWER
  4. Then press the button again twice RESUME.
  5. Release all the buttons.
  6. Indicator led in green and stay green.
  7. Click the button 4 times RESUME, if you want to make another transaction. :
Look at the table below:

1 led- Orange – Service test print 1 times – Orange – Service test print
2 led – Green – EEPROM information print 2 times – Green – EEPROM information print
3 led – Orange – EEPROM initialization 3 times – Orange – EEPROM initialization
4 led – Green – Waste ink counter setting 4 time – Green – Waste ink counter setting
5 led – Orange – Destination setting (Press Power > Press Resume 3x) 5 times – Orange –
Destination setting (Press Power> Press Resume 3x)
6 led – Green – Print head deep cleaning 6 times – Green – Print head deep cleaning
11-13 led – Orange, Green, Orange – Return to menu selection
14 led – Green – Left margin correction 14 times – Green – Left margin correction
  • Turn off the printer POWER button.

Read More...

How to Reset Printers Canon Pixma iP3000, iP4000, iP5000 Ink-Waste Overflow Counter

Resetting Ink-Waste Overflow Counter Canon Pixma iP3000, iP4000, iP5000 Printers

  • With the printer plugged in and powered off, press and hold the Resume/Cancel button, then press and hold the Power button. (DO NOT release the buttons. The LED light should be green to indicate that a function is selectable.).
  • While holding the Power button, release the Resume/Cancel button. (DO NOT release the Power button)
  • While holding the Power button, press the Resume/Cancel button 2 times, and then release both the Power and Resume/Cancel buttons. (Each time the Resume/Cancel button is pressed, the LED lights alternately in orange and green, starting with orange)
  • When the LED light is green, press the Resume/Cancel button 4 times. (Each time the Resume/Cancel button is pressed, the LED lights alternately in orange and green, starting with orange)
  • Press the Power button. The LED lights in green, and the reset is performed. (When the operation completes, the printer returns to the menu selection mode automatically)
  • Press the power button to exit service mode.
Note:
if you accidentally press the Resume/Cancel button more than 4 times in step 4 then just press the Resume/Cancel button at least 10 times and the printer will be returned to step 4 automatically

Read More...

How to Reset canon iP 1700 and iP1300

Resetter canon iP 1700 and iP1300

Step 1 : Reset Hardware

  1. Turn off Canon Pixma iP1700, iP1300 Printers
  2. Hold down Resume button and press Power button.
  3. Keep holding down Power button and let Resume button go.
  4. Press Resume button 2 times then let BOTH buttons go.
  5. Green lights will flash and then stop blinking.
  6. When green lights are solid, press the Resume button 4 times.
  7. Press the Power button and the Canon Pixma iP1700, iP1300 Printers should turn off, if not, press the Power button once more.
  8. Your Canon Pixma iP1700, iP1300 Printers should respond as normal

Step 2 : Using software resetter
  1. Download Software Resetter for Canon Printers iP1300 dan iP1700
  2. Ekstrak/Unrar/Unzip the Software
  3. Run GeneralTool.exe
  4. Select USB Port where the canon ip1300 or canon ip1700 installed.
  5. CLick Lock Release button
  6. Select EEPROM CLEAR
  7. Click Test Pattern 1 button
  8. Your Canon Pixma iP1700, iP1300 Printers should respond as normal.
Download Software Resetter for Canon Pixma iP1300, iP1700

Read More...

How to Reset Canon Pixma iP1200, iP1600 and iP2200

Canon Pixma iP1200, iP1600, iP2200 Resetter

  1. Download software for Canon iP1200, iP1600, 2200 Printers.
  2. Unzip downloaded file by WinZip, 7Zip, Izarc, etc
  3. Run GeneralTool.exe
  4. Select the connected USB port number from USB PORT
  5. Click LOCK RELEASE, and select the applicable model name in SET DESTINATION
  6. In CLEAR WASTE INK COUNTER, select MAIN or PLATEN. The selected waste ink counter will be reset. MAIN resets the main waste ink counter, PLATEN resets the platen waste ink counter.
If both the main and platen waste ink absorbers are replaced, reset both the main and platen waste ink counters.

Download Service Tool Software for Canon Pixma Printer iP1200, iP1600, iP2200

Read More...

How to Reset Canon iP1880, IP 1100, iP1800 and iP2500 series

This tutorial solutions to reset canon iP 1880 or canon iP1800 series and work also in canon pixma iP1100, canon pixma iP2500. before reset using general tools you must reset the printer hardware. This way cannot to change ink level status canon pixma iP1880. following tutorial and software resetter to reset Canon Pixma iP1880.

Step 1: Reset hardware

  1. Press Resume button hold for 1 – 2 minutes
  2. Open the cover
  3. Release the catridge and then put catridge again
  4. Close The Cover
  5. Turn Off
  6. Then Turn On again

Step 2: Reset Software using general tools
  • Download software resetter or general tools for canon pixma iP1880
  • Driver should have been install correcly.
  • Connect USB cable.
  • Before connect power, press and hold power button then connect the power.
  • At the same time Hold power button, and press reject button for 2 times then release power button.
  • Run software resetter for canon iP1880.
  • Don’t forget to open lock release in the software. ( note : to view locK release menu, min resolution 1024 x 728)
  • Then select Set Destination to iP1880
  • Check CLEANING and EEPROM CLEAR
  • Click MAIN and PLATEN
  • Finally test print by click TEST PATTERN1.

Note : for permanent reset waste ink canon iP1880 Printers pls, resetting use software resetter. Above way can be used at canon IP 1100, iP1800 and iP2500 series

Download
service tool for Canon iP1880

Read More...

How to Reset Printer Canon Pixma MP450

Here manual reset procedure for Printer Canon Pixma MP450 :

  1. Turn off the Printers .
  2. Hold button Resume/Cancel (red triangle in the circle), click on POWER – an indicator light green.
  3. Release the button Resume / Cancel keeping POWER.
  4. Click Resume/Cancel 2 times, keeping POWER, and then release all the buttons.
  5. When the indicator recorded GREEN – click Resume / Cancel 4 times!
  6. Turn off the Canon Pixma MP450 Printers POWER button.

Read More...

How to Reset Manual for Canon Pixma MPC190 Printers

Follow the step below how to reset manual for Canon Pixma MPC190 Printers :

  1. Enter the service mode SERVICE MODE – pressing buttons Menu, Copy, Scan, Copy, Copy
  2. Choose TEST MODE.
  3. Select 8 PRINTER TEST TEST MODE.
  4. Choose 3, EEPROM CLEAR
  5. Select 0, INK COUNT
  6. Press the Set button.
  7. Click Stop / Reset button (return to item 3), and again press the ON / OF

Read More...

How to Reset Canon Pixma MP110 and MP130

How to Reset Canon Pixma MP110 and MP130

Try this methode to reset Canon Pixma MP110 and MP130 printers

Resetting overflow error code for Printer Canon Pixma MP110 :

  1. Turn on the printer.
  2. Click Menu, and then Scan, Copy and Scan again. All – entered the service mode.
  3. Select Counter
  4. Click Copy – everything. Waste dropped to zero.
  5. Turn off the printer POWER button.

Reset Canon Pixma MP130 Printer
  1. Turn on the printer.
  2. Press the MENU key, and then SCAN, COPY and SCAN again – entered the service mode.
  3. Select NVRAM ACCESS further OK.
  4. Select SET ABS-M LEVEL and set value equal to zero.
  5. Select SET ABS-R LEVEL (if any) and is set to zero.
  6. Turn off the printer POWER button.

Read More...

How to Reset Canon Pixma Mp150, Mp160, Mp170, Mp180, Mp450 and Mp460 Using Mptool Software

Besides service tool, mptool is the popularness software to reset printers canon pixma series like MP150, MP160, MP170, MP180, MP450 and MP460. Excess of software that is the program measure of small and amenity of usage. Ability of the software that is to reset level black and color cartridge at canon pixma mp series. And there also facility to write and read EEPROM in the printer. Other excess this software is detect automatically installing printers in the computer.
MP Tool Software
Reset Ink Counter.

Reset ink counter that is resetting ink level (ink metrer) cartridge at printer.

  • Reset Black – reset level black ink cartridge.
  • Reset Color – reset level colour ink cartridge.

Reset waste ink counter

To reset waste ink counter at printers canon pixma MP150, MP160, MP170, MP180, MP450 and MP460 there any 2 choice, that is :
  • Reset Main (main).
  • Reset Platen (additional).
Download MPTool Software support for Canon MP150, MP160, MP170, MP180, MP450, MP460

Read More...

How to Reset Waste Ink Counter Canon Pixma MP145

I get from forum but still untried, just sharing for the things requiring reset procedure for Canon Pixma MP145 to reset counter in the Canon Pixma mp145. Following is the procedure to reset waste ink counter Canon Pixma MP145 :

  • Connected Printer to a Power source, Turn off the printer if printer on
  • With the Printer power off, press the Power button while press and hold Stop/Reset button.
  • When the Power led is light, press Stop/Reset button two times while pressing and holding the Power button.
  • When releasing the Power button and the Stop/Reset button (regardless of order), the printer will move into a service mode. (Waiting for menu selection)
  • When the on/off lights in green, press the Stop/Reset button four times to reset wase ink counter. For other specified number pressed function listed in the table below. (Each time the Stop/Reset button is pressed, the LED lights alternately in orange and green, starting with orange).
  • Unplug cable power from a power source.

Read More...

How to Reset Waste Ink Counter Canon Pixma iX5000 and iX4000

To reset counter Canon PIXMA iX4000 or iX5000 you have to enter to service mode. Procedure to enter to service mode on Canon PIXMA iX4000 or iX5000 is as following :

  1. Connect the Canon PIXMA iX5000 or iX4000 printer to the power cord. ( note : If the automatic power-on function is enabled in the printer, the printer enters the service mode for the first time, but it will never enter the service mode if the printer is turned off by the Power button. This is because the printer remains to be turned on internally if the power is turned off by the Power button. To prevent this, disconnection of the power cord is required before starting the printer in the service mode ) .
  2. With the Canon PIXMA iX5000 or iX4000 printer powered off, while pressing the Resume/Cancel button, press and hold the Power button. (note : Don’t release the buttons. The Power LED lights in green to indicate that a function is selectable.)
  3. While holding the Power button, release Resume/Cancel button. (Don’t release the Power button.)
  4. While holding the Power button, press Resume/Cancel button 2 times, and then release both the Power and Resume/Cancel buttons.
  5. When the Power LED lights in green, press the Resume/Cancel button 4 times to reset waste ink counter in the Canon Pixma iX5000 / iX4000. (note : If the Power LED does not light in green the printer does not enter the service mode, disconnect the power cord and plug it again. Then start from step 1 to start the printer in the service mode again).
  6. At the end of the service mode, press the Power button. The paper lifting plate of the sheet feed unit will be raised.
Note :
  • Each time the Resume/Cancel button is pressed, the Alarm and Power LEDs light alternately, Alarm in orange and Power in green, starting with Alarm LED.

Read More...

How to Reset Canon i80 Waste Ink Tank Full

This tutorial to reset waste ink in the printer canon i80. I not yet tried this tutorial, because this tutorial is I get from forum service printer. following step bt step to reset printer Canon i80 :

  • Close the print head cover, and turn off the printer.
  • While pressing the Resume/Cancel button, press the Power button *.
  • While holding the Power button, release the Resume/Cancel button **.
  • While holding the Power button, press the Resume/Cancel button three times, and then release the Power and Resume/Cancel buttons ***. During initialization, the LED blinks in green.
  • When the LED stops blinking and lights in green, press the Resume/Cancel button the 4 times ***.
  • Press the Power button. The LED lights in green, and the selected function is performed. When the operation completes, the printer returns to the menu selection mode automatically.
  • Power off the printer and then back on and test.
Note :
  • (Do not release the buttons. The LED lights in green to indicate that a function is selectable.)*
  • (Don’t release the Power button.)**
  • (Each time the Resume/Cancel button is pressed, the LED lights alternately in either orange or green, starting with orange.)***

Read More...

How to Reset Canon Pixma iP90

Canon pixma iP90 released almost at the same time with canon Pixma iP 1880. Canon iP90 is printer with single function. Cartidges which used in canon Pixma iP90 is BCI-15BK, BCI-115C dan BCI-16C. Resetting procedure canon iP90 almost the same as manual reset canon iP1880. You can use combination of button in the printer to reset the printer.

Follow the step to resetting canon Pixma iP90 :

  • Before resetting printer canon iP90, start with printer power off .
  • Press resume button coincide with power button.
  • While pressing power button, release resume button.
  • Press resume button 2 times and then release both button
  • Green LED indocator will blinking and then stopped blinking.
  • When the Power LED lights in green, press resume button 4 times.
  • Press power button and the printer power will off. otherwise off, depress again power button.
  • And the turn on the printer again, your printer canon iP90 should be response as normal.

Read More...

How to Reset Counter Canon i250, i255, i350, i355

To reset waste ink counter pad in Canon i250, i255, i350, i355 there are two Steps, that is reset manual and reset use software resetter (general tool). Whereas reset manual any two methode can be used. Here Complete tutorial to reset waste ink counter for Canon i250, i255, i350, i355 printers

Manual Reset for Canon i250, i255, i350, i355

Methode 1 : Manual for service mode

  • Unplug power cable from electric source and USB cable from computer.
  • Open the printer cover and hold power button.
  • Connect power cable to the electric source.
  • Close the printer cover then release power button.
Methode 2: Manual for service mode
  • Turn off the printer. And disconnect the printer cable.
  • Press and hold the POWER button, turn on the printer.
  • The indicator LED should be green.
  • Press and release the RESUME button , the indicator LED should be orange.
  • Press and release the RESUME button again, the indicator LED should be green.
  • Release both buttons.
Resettting using software resetter canon i250, i255, i350, i355
  • Reconnect the printer cable.
  • Download and Run General Tools/software resetter for Canon printers i250, i255, i350, i355.
  • Then select USB PORT where your printer installed.
  • Choose printer type in SET DESTINATION sections and printer should be reset.
Note : After service mode use software for permanent reset Canon i250, i255, i350, i355

Download resetter Canon i250, i255, i350, i355

Read More...

How to Reset Canon iP1200, iP1600 and iP2200

Resetter Canon iP1200, iP1600, iP2200

How to Reset Canon iP1200, iP1600 and iP2200

  1. Download software for Canon Pixma iP1200, iP1600, 2200 Printers from download link above.
  2. Extrac downloaded file by extracded software like WinZip, 7Zip, Izarc, etc.but I recommend to use 7zip, because this software free and usefull and support many compresion format,
  3. Goto extracted folder and then this tool by clicking GeneralTool.exe file
  4. Select the connected USB port number from USB PORT where your printer installed.
  5. Click LOCK RELEASE, and select the applicable model name printer in SET DESTINATION section. there are four choice there that is iP2200E, ip2200j, ip1600e, ip1200e . corresponding to your printer
  6. To reset waste ink counter In CLEAR WASTE INK COUNTER section, select MAIN or PLATEN. The selected waste ink counter will be reset. MAIN resets the main waste ink counter, PLATEN resets the platen waste ink counter. If both the main and platen waste ink absorbers are replaced, reset both the main and platen waste ink counters.
DOWNLOAD Service Tool Software for Canon Pixma Printer iP1200, iP1600, iP2200

Read More...

How to Reset Counter Canon iP1500 and iP1000

Reset canon pixma ip 1000 is equal to resetting canon ip1500.but used resetter differ. Process to reset both printer is same. Way able to be used to reset canon pixma ip1000 and ip1500 there are two steps. Before resetting canon pixma ip1000 and ip1500 the printer have to steps into service mode. Following its way to reset canon pixma ip1000 and ip1500 printers :

Steps 1: Enter to Service mode

  • Unplug power cable and USB cable.
  • Open front case of printer and then press and hold power button.
  • Connected cable power to elecric source then close printer cover and then release power button.
  • Tide USB cable to computer.
Steps 2 : Reset Waste Ink Counter
  • Download software resetter / general tools for Canon Pixma IP1000 and canon pixma IP1500. Dowmload both of software from download link above.
  • Run the software and select printer from USB port.
  • Click the iP100 button for canon iP1000 In the SET DESTINATION sections and the printer should be reset.
  • For Canon iP1500 select printer type in the set destination sections and then click main and platen button in the waste ink counter section to reset counter the printer.
  • After resetting the printer turn off the printer and turn on again. To ascertain the printer have normal, use to print.
General tools or software resetter for canon pixma iP1500 and canon pixma ip1000 download from these link:

iP1500 Service Tool.zip | iP1000 Service Tool.zip

Read More...

How to Reset canon i320

Reset canon i320.! Ints easy you is only requiring two steps, that is reset manual for service mode and reset using software resetter for permanent reset.

Following this steps to reset printer canon i320

Step 1 : Reset Manual for service mode

  • Discharging all cables (power cable and USB cable ) at the printer
  • Open front cover of printer and then press and hold the power button.
  • While holed power button, Connect the power cable to power source .
  • Close printer cover, then release power button.
How to Reset canon i320
Step 2 : reset using Software resetter i320 for Permanent reset
  • Download software resetter for canon i320. After finishing download the file, extrac this file by click i320.exe file.
  • Now Reconnect the USB printer cable to computer.
  • Run General Tools software resetter for Canon printers i320 by clicking generaltool.exe file
  • Select where your printer installed in the USB PORT
  • Choose SET DESTINATION 1 to reset the printer and the printer should be reset.
Download software resetter Canon i320 here

Read More...

Software to Restore EEPROM for Printer Canon iP2200, iP1600, iP6210D, iP6220D, MP150, MP170, and MP450

Software to Restore EEPROM for Printer Canon iP2200, iP1600, iP6210D, iP6220D, MP150, MP170, and MP450

This software can be used to restore EEPROM for for Printer Canon iP2200, iP1600, iP6210D, iP6220D, MP150, MP170, and MP450. I don’t know this software worked or not because I not yet tried the software.

Software to Restore EEPROM for Printer Canon iP2200, iP1600,  iP6210D, iP6220D, MP150, MP170, and MP450In you get problem on EEPROM on your printer, maybe this software can solve your problem.

For the software download here

Read More...

How to Disabling Low Ink Level Notification for Canon IP and MP

The reset method work for canon printers that using PG-40 and CL-41 cartridges. After doing this reset method your printer will not display low ink notification anymore and will not show error code “E4″ or “E5″. This method takes from indoreset yahoo group and prepared by Choy.

Here how, the method to reset ink level notification:

  1. Push “resume” for 5 seconds for canon IPXXXX. For canon MPXXX you must enter to service mode.
  2. Push Power switch then remove power cord.
  3. Insert plug power cord while pressing “power switch” at the same time.
  4. Push Start/reset by step 2 continue Wait display shown “0″
  5. Push + change display from “0″ to “1″
  6. Push color button 2 times
  7. Push Power switch again , Printer will print 1 page
  8. Open cover
  9. Unplug power cord
  10. Take out ink cartridge #40 and #41
  11. Insert plug again
  12. Push power switch
  13. Open cover (scan cover)
  14. Insert ink cartridge #40 and #41 again
Enter to service mode for canon MPXXX
  • With the printer powered off but connected to a power source, press the Power button while pressing and holding the Stop/ Reset button.
  • When the Power is lit, press the Stop/Reset button two times while pressing and holding the Power button.
  • When releasing the Power button and the Stop / Reset button (regardless of order), the printer will move into a service mode. (Waiting for menu selection)

Read More...

How to Reset Canon MP600

Manual reset waste ink counter pad and reset to factory setting for canon MP600 printer.

Reset Counter MP600

  1. Turn off the printer
  2. Press and hold the Resume Button, add a printer an indicator light green.
  3. Press and hold the Power Button, while hold Power button, release the Resume Button.
  4. While hold the Power Button, double click Resume button and then Release Both Buttons.
  5. Click Resume for Four times.
  6. Once you click Power, to confirm the selected action (reset counter absorber).
  7. Turn off the printers.
Reset Canon MP600 to the Factory Setting
  1. Press the HOME button.]
  2. Use the Easy-Scroll Wheel or the right/left arrow to select Settings, and then press OK button.
  3. Use the Easy-Scroll Wheel or the right/left arrow to select Device settings, then press the OK button.
  4. Use the Easy-Scroll Wheel (B) or the up/down arrow to select Reset settings, then press the OK button.
  5. Use the Easy-Scroll wheel or the up/down arrow to select Yes on the confirmation screen and then press OK.
  6. Press the HOME button to return to the HOME menu.

Read More...

How to Reset Manual Printer Canon MP500

Manual reset method for canon MP500

  • Press and hold STOP/RESET button.
  • Press and hold POWER button.
  • Release STOP/RESET button without releasing power button.
  • Click STOP/RESET two times and then release power button.
Now your printer enter into service mode. Next
  • Prepare paper on the paper tray
  • Press Stop/reset button for 1 times and then press power button, await till printer finished print.
  • Press Stop/reset button for 2 times and then press power button, await till printer finished print again.
  • Press Stop/reset button for 3 times then press power button to reset EEPROM.
  • Press Stop/reset button for 4 times then press power button to reset Waste Ink Counter.
  • Switch off the printer. if printer doesn’t turn off, press button power until printer off.

Read More...

How to Reset Canon Printers using Service Tool or Software Resetter

Generally, Canon resetter programs have similar resetting procedure except for some models. So that successful resetting canon printers using service tool all file attributes of software resetter should not be read only and don’t run the software from CD. There are two version of general tool for canon printer that is with lock release button and do not have Lock Release button.

For resetter with Lock Release button (found inside the executable file)

How to Reset Canon Printers using Service Tool or Software  Resetter

  1. Run generaltool.exe or the application or executable file.
  2. Select USB port of the printer to be reset.
  3. Click lock release button.
  4. IN Select Destination option, select the printer model.
  5. In Test Print option, select EEPROM clear.
  6. Prepare a paper and then click test pattern 1 under Test Print option.
  7. Turn off the printer and turn on again.
For resetter which do not have Lock Release button

How to Reset Canon Printers using Service Tool or Software  Resetter
  1. Run generaltool.exe or the application or executable file.
  2. Select USB port of the printer to be reset.
  3. In Select Destination option, select the printer model.
  4. In Test Print option, select EEPROM clear.
  5. Prepare a paper and then click test pattern 1 under Test Print option.
  6. finish it

Read More...

How to Reset Printer Canon MP360 Waste Ink Tank Full

Reset procedure for Canon MP360 MultiPASS printer. The following procedure is copied from fixyourownprinter forum . Some user tried the procedure to reset waste ink tanf full on Canon MP 360 and reset error #343 Canon MP360 MultiPASS printer and mentioned it works.

Short Review For Canon MultiPASS MP360

The Canon MultiPASS MP360 Desktop Photo Printer Copier and Scanner delivers exceptional performance and versatility to the home office. Print high-quality text and photos quickly copy documents and graphics and easily scan photos and other images – all with one compact machine.

By using high-intensity color inks and pigment-based black ink the MultiPASS MP360 can increase your satisfaction with printing and copying output. It even delivers borderless copies and photos. borderless prints perfect for framing or the scrapbook. Both scanning and copying quality are improved with the use of CCD color scanning technology and a maximum software enhanced resolution of 9600 dpi with 48-bit color depth. Print speed the Canon MultiPASS MP360 up to 18 ppm in black up to 12 ppm in color

Manual Reset Procedure To reset waste ink tank error and reset error code #343

Manual Reset procedure Waste Ink Tank for Canon MP390 and Canon MP360 Just Follow this step how to reset waste ink tank full :

  1. Start with printer on, press aadditional functions, Scan, Copy, Scan. Now you should be in service mode.
  2. Select Test mode which is like the last available selection
  3. Select #8 Printer Test, it will do something here like cleaning or something then it will come up with some other option this is where it gets a bit confusing cause now all it says is like 8-2 or 8-3 push the + or – button until it says 8-3 then hit the select button
  • The menu will now say EEPROM Clear
  • Select Ink count which is option (0) and press set
  • Then press Stop/Reset Followed by the power button and then wait for it to restart.

Read More...

How to Reset Canon Pixma MP520

Reset procedure for Canon Pixma MP520, posting by BilBg (bulgaria) in fixyourownprinter forum, procedure for resetting the Canon Pixma MP520 with button combinations. Some users in this forum which have tried this method (canon MP520 reset methode) say this method work on Canon MP520.

Here Procedure Resetting Canon Pixma MP520 (Picture by BilBg):

How to Reset Canon Pixma MP520

  1. Switch the printer OFF
  2. Press buttons 1 + 2 + 3 and 4 (simultaneously using four fingers)
  3. Keep pressing this four buttons for 10 seconds
  4. Release the On/Off button (number 4) (Keeping pressing the others)
  5. After a few seconds (when the printer go ON) you can release buttons 1, 2, 3
A litte Notes by BilBg:
  1. Maybe step “c)” is not needed
  2. This procedure was used when I refilled the Black cartridge – try using the ColorCopy button instead of BlackCopy button (number 1) if you refill Color cartridge.Maybe there is no need for all the four buttons – you can try 1 + 4, 2 + 4 or 3 + 4. (or 1+2+4, 1+3+4, 2+3+4)

Read More...

Solution Canon Pixma IP4300 Error 6A00

Solution Canon Pixma IP4300 Error 6A00, the tips from someone in printer forum include with picture. Solotion error 6A00 follow intructions in the picture. This methode also work in Canon iP4200 and some user says can be used in Canon MP800. (Complete see picture include with descriptions)

Solution Canon Pixma IP4300 Error 6A00

Read More...

Error Code for Printer Canon IP1300, IP1700, IP1200, IP1880 and IP1980

Having problem with Canon IP1300, IP1700, IP1200, IP1880, IP1980. Sign that looked to be only led blinking. Following some solutions problem of printer that marked with led blinking.

3x Orange 1x green
Problem : any problem with printer mechanics
Solution: If you don’t have knowledge about printer mechanic, will better if bring the printer to Canon service center.

4x orange 1x green
Problem printer absorber full
Solution: Reset the printer using generaltools or software resetter. If not work using reset manual. Each printers having different set of manual reset

5x orange 1x green
Problem: Black or Color cartridge trouble.
Note: problem is usually caused many matters, for example chips error, conector is dirty, etc.

7x orange 1x green
Problem: Black or Color cartridge trouble.
Note: problem is usually caused many matters, for example chips error, conector is dirty, etc.

8x orange 1x green
Problem : printer absorber full (Waste Ink Pad Full)
Solution: Reset the printer using generaltools or software resetter. If not work using reset manual. Each printers having different set of manual reset

Read More...

Reset Ink Level Printer Canon Pixma iP1800 Using iPtool

I get this tutorial from forum http://www.fixyourownprinter.com solve the ink level error in canon Pixma iP1800/Canon Pixma iP1880. Problem in the canon cartridges after refillled, the ink level never reset from the original empty status and you can’t print at all since the ink level are reporting that the cartridges are totally empty.

If you have the like that, try this to solve the problem.

  1. Press power button while plug in the powerchord – green lamp.
  2. While hold the power button press resume button twice – orange blink and return to green.
  3. Release the power button, Then the pc will recognize new printer install.
  4. Then run the iptools from software
  5. Click the reset black reset color
  6. Click the reset main and reset platen. You will see in the iptol menu that the ink level will be reseted and the WP and WM will set to 0 and new cartridege installed. then exit
  7. Restart the printer
If the problem still occured, do the same procedures from 1 to 3 then.
  • Click the eeprom reset botton
  • Wait for for a second the menu will be resetted and the printer will initialized.
  • Turn off the printer then turn on and try to print..
by the way i recognize the printer that if u park the head of printer in the replace ink area position, there will be a blinking error u will notice after a few print or after used you need to reset the eeprom in iptools.

Read More...

Fix Problem After Resetting Canon Pixma iP1700

After a few day expreiment with my canon Pixma iP1700, I find two problem often happened when resetting the printer. First case, My Canon pixma Pixma ip1700 becoming Canon Pixma ip1300 after resetting the eeprom, second case, cartridge not recognize after resetting the counter then the led blinking 5X orange and 1X green..

1. My Canon pixma ip1700 becoming ip1300
My Canon Pixma iP1700 becoming canon Pixma iP1300, this problem happened after resetting the eeprom of Canon iP1700 using iPtool. The solutions for this problem :

  • Install driver for canon iP1300, you can download the driver in the canon website.
  • Now run iPtool software, auto recognize as Canon Pixma iP1300
  • In the change model set the printer to iP1700.
  • In the EEPROM Operations click reset button. Turn off the printer and turn on again, the problem solved now your Canon printer becoming Canon Pixma iP 1700 again.
2. Blinking orange 5x and green 1x and the color/black cartridge not recognized
This problem appear after several times reset ink level the cartridge. If this reset methode does not work to solve the problem. I get this solution after several times try resetting using various combinations button. Solutions for the problem are:
  • Start with printer off
  • Hold down Resume button and press Power button.
  • Keep holding down Power button and press Resume 2 times, then press and hold the resume button, release power button.
  • Green lights will flash and then stop blinking (Keep hold the resume button).
  • When green lights are solid, release resume button and press again the Resume button 4 times.
  • Don’t switch of the printer (because if your trun off and turn on again the printer the problem still appear), Now reset the counter and EEPROM canon iP1700 using iPTool software (recommended).
  • Turn off and turn on again the printer, the printer should respond as normal. In my Canon iP1700 problem solved.

Read More...

Blog Archive